Offering membership in your museum or organization gives the people of your community an opportunity to support and participate through programs, events, and activities. Membership can also provide an important source of revenue for the museum.
Use this screen to create, view, and edit membership information, including membership name, type, billing information, dues receipts, past-due reminder letters, and more.
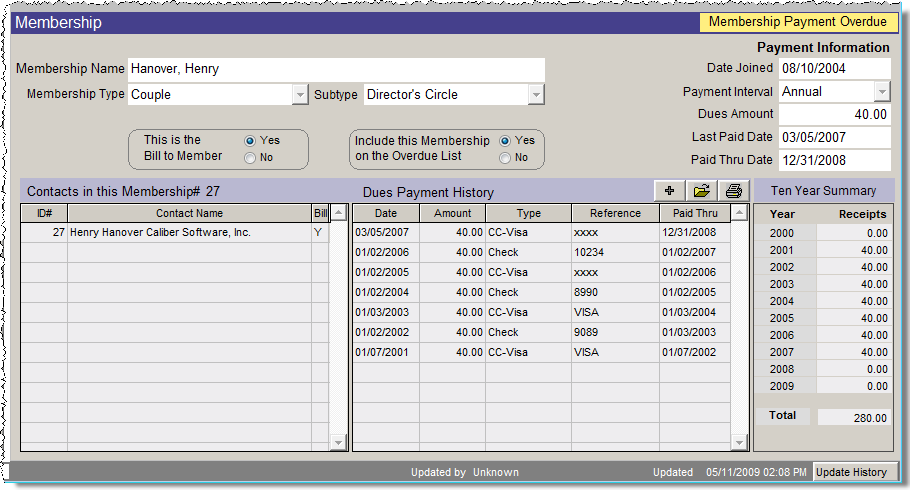
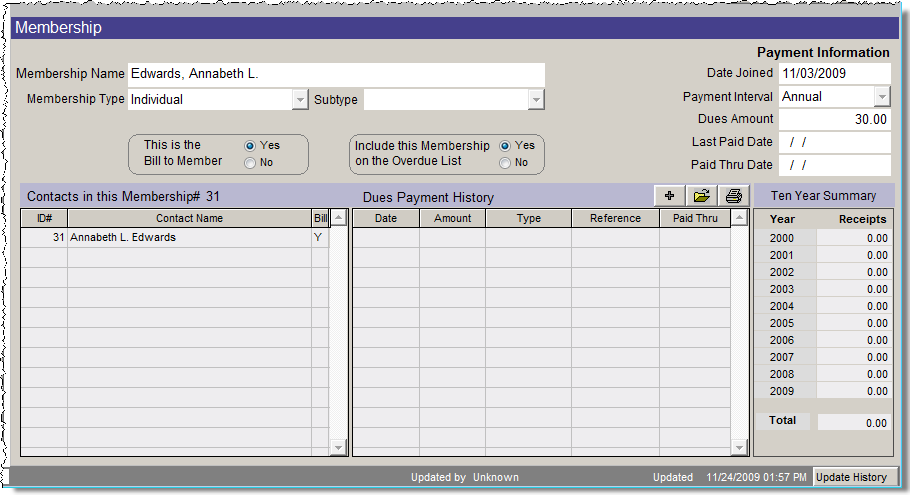
Membership Screen View
There are two ways to create memberships in PastPerfect. One is to create a new membership for a contact. Use the Become a New Member button for a contact who has decided to join your institution as a new member, or when entering backlogs of old memberships.
A contact may also be added to an existing membership. Use Join an Existing Membership when the contact is not getting his or her own membership, but has become part of another contact's membership. If you have family memberships, this can be used to join people within the household who have their own contact records to one membership record. We will walk through the steps of creating both types of memberships here.
To create a new membership for a contact:
Create New Membership screen
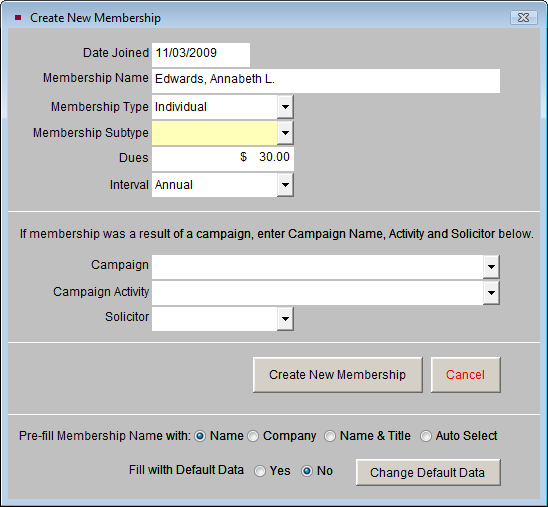
Date Joined - This field will be pre-filled with today's date. If this member joined before today, for example if you are entering a backlog of memberships, you may change this date to reflect the date the member joined.
Membership Name - This field will be pre-filled with either the Name, Company, or Name & Title field from the contact record. You may change which field pre-fills the Membership Name by changing the option at the bottom of the screen for Pre-fill Membership Name. If you choose Auto Select, PastPerfect will use the Company name if there is one, or the name in Last name, First name format if there is no company. If there is no Last Name and First Name, it will use the Name & Title field. It is suggested that you format the Membership Name in Last Name, First Name format to be able to sort memberships alphabetically.
Membership Type - Use the drop-down menu to choose the membership type for the member. The Dues field will be filled in with the dues amount for that membership type. The membership types and dues amounts are set up by going to the Main Menu | Setup | Contacts | Membership Types.
Membership Subtype - If your institution uses subtypes, choose the subtype from the drop-down menu. This field is not required. The membership subtypes are set up by going to the Main Menu | Setup | Contacts | Membership Subtypes.
Dues - Use this field to record the default dues amount for the chosen membership type.
Interval - Use this field to record how often the member will pay dues. If the member is a Life member, choose Life as the interval.
Campaign, Campaign Activity, and Solicitor - If the member joined as a result of a campaign, choose the campaign name, campaign activity, and solicitor from the drop-down menus. These fields are not required. For more information about setting up campaigns, see Chapter 23 - Campaigns and Pledges.
Fill with Default Data - You may set up default data to speed data entry when creating new memberships. Enter your default data by clicking Change Default Data. The default data will be pre-filled for each new membership. This can be helpful if many of your memberships have the same information, such as an Interval of Annual. To use the default data, click the Yes radio button next to Fill with Default Data.
Once you have filled in the fields on the Create New Membership screen, click the Create New Membership button.
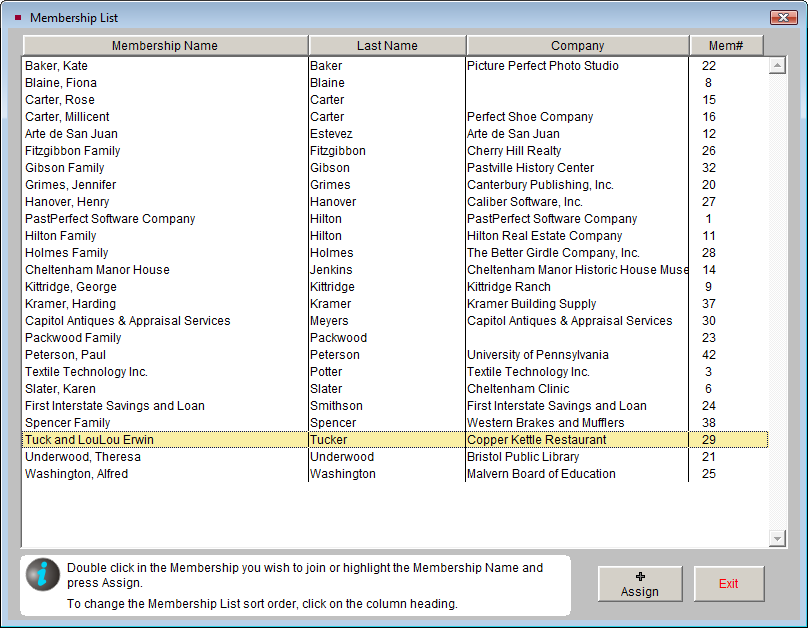
To add a contact to an existing membership:
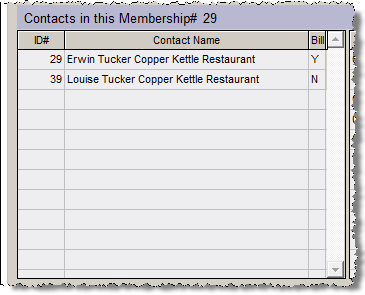
Contacts in this Membership List
You will now be able to fill in more of the membership fields and enter dues payments. Two fields should be made note of on the new member's screen:
Membership screen for a new member
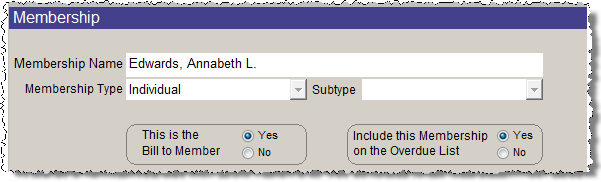
This is the Bill to Member - One contact per membership is designated as the Bill to Member, meaning that contact will receive the membership invoices. By default, this is the first contact added to a membership. If you add more contacts to this membership, they will not be the Bill to Member, as only one contact can be designated as the Bill to Member. If you need to change the Bill to Member to a different contact, first go to the non-billing member's contact record and click the Membership button. Click Edit at the top of the screen, then click Yes next to This is the Bill to Member. Other contacts' status will be changed to No (non-billing members).
Include this Membership on the Overdue List - By default, this membership will be set to be included on the Overdue List by having Yes selected here. This means the membership is active, and your organization will continue mailing information and overdue notices when applicable. The membership will show up on the Active Memberships Fixed List. If this is set to "No," then the membership will be inactive. An Inactive Membership flag will appear on the screen and the member will be on the Inactive Memberships Fixed List.
Membership screen and Active Memberships Contact List

You may choose to set your members to "No" to make them inactive after their memberships have expired for a certain period of time. PastPerfect does not do this automatically. It is up to your organization to decide which members become inactive and when.
Once a membership has been created, you can enter an alternate billing address, view overdue lists and letters and dues history.
Alternate Billing Address - The alternate billing address is helpful if a contact receives a gift membership. The gift membership is entered as outlined above for creating a new membership. The giver's contact information may be added as the alternate billing address, as seen below.
To create an alternate billing address:
Alternate Membership Billing Address screen
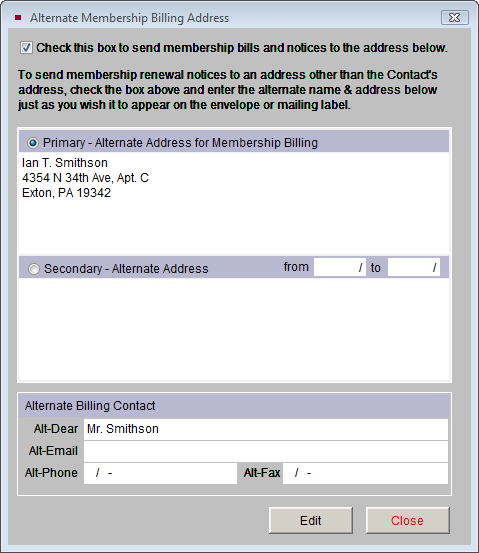
The alternate billing address will be used for this member when printing letters, labels, and envelopes. To make sure this alternate billing address is used when mailing to the entire membership, you will need to use the Billing Members Fixed List when mailing to members, or use billing members when creating your own lists. When printing labels, use Label Style 4, 5 or 6. Letters will need to be modified to include the "Addr_Box_MemBilling" and "Dear_MemBilling" fields. For more information about creating letters and labels using the alternate billing address, please see Chapter 22 - Letters, Labels & Email.
To enter a Membership Dues receipt:
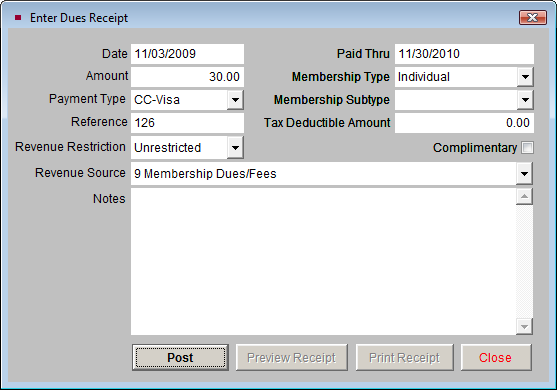
If the dues amount you entered was different from the default dues amount, you will be asked if you want to change the default dues amount for this member to the new amount. Clicking Yes enters the new amount in the Dues Amount field in Payment Information on the Membership screen.
Once the dues amount is posted, you may preview or print the Dues Receipt. To modify the dues receipt form, go to the Main Menu | Reports | Dues & Donations | Dues Payment Receipt | Custom Layout 1 or 2 | Modify Report Layout. After you have printed the dues receipt, click Close.
TIP: If you would like to send a thank you letter to this member for joining or renewing the membership, you may do so by printing a mail merge letter. Mail merge letters are accessed by clicking Print at the top of the contact screen. The letters are set up by going to the Main Menu | Setup | Contacts | Mail Merge Letters.
The new payment will be listed under Dues Payment History. If you need to modify or delete this payment, double click on it to bring up the Dues Receipt Detail screen, or click once on the payment and click the file folder icon above the Dues Payment History. You will see the screen shown below.
Dues Receipt Detail screen
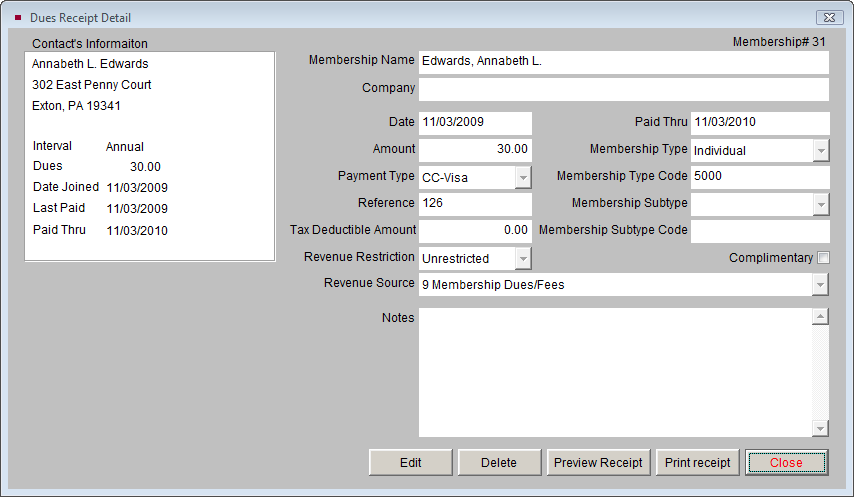
To print or preview all the dues payments for this membership, click the Print Dues Payment History button under Actions in Sidebar, or click the printer icon above the Dues Payment History.
After a dues payment is posted, you will see the Last Paid Date and the Paid Thru Date under Payment Information updated to reflect the latest payment. If a membership is overdue, you will see a Membership Payment Overdue flag above the Payment Information.
Payment Information section of Membership Screen View
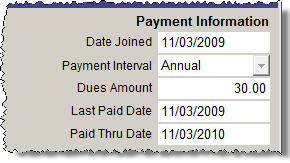
Below the Payment Information section you will see the Ten Year Summary of dues payments. This summary displays the total dues payments from this member for the past ten fiscal years.
Click Overdue/Renewal List & Letters under Actions on the Sidebar to see a list of members whose dues are outstanding for the date range at the top of the screen, shown below.
NOTE: The Overdue/Renewal List shows only the Bill to Members, not all contacts assigned to a membership. It also includes only the memberships that have Yes selected for Include this Membership on the Overdue List.
Membership Renewal List
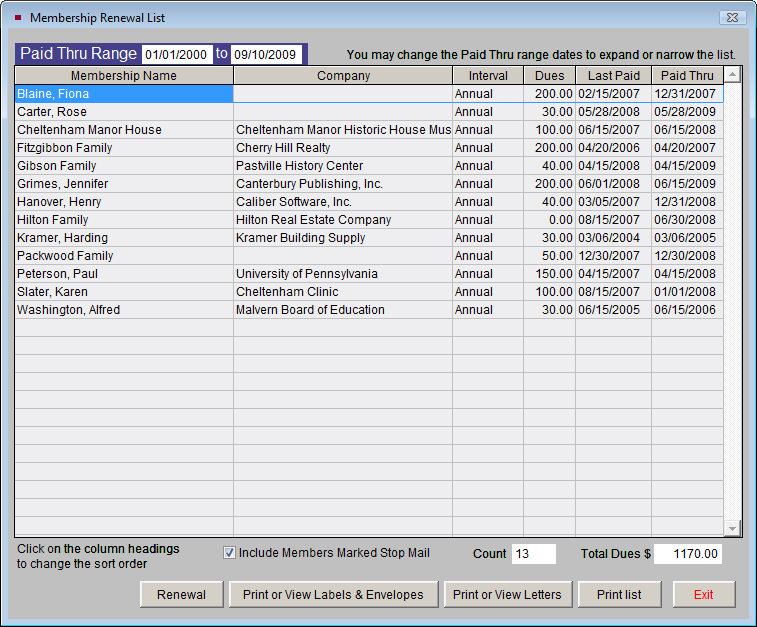
From this screen you can print overdue letters and mailing labels or print a copy of the entire list. PastPerfect automatically updates the overdue list according to the Paid Thru Date field on the Membership screen.
You may change the Paid Thru Range at the top of the screen to see memberships that expire in different date ranges. For example, if you want to see all members who are overdue as of a certain date, such as 09/10/2009, going all the way back to the earliest of your memberships, for the Paid Thru range enter: 01/01/1900 through 09/10/2009. If you want to see only memberships which expired in August 2009 enter the Paid Thru range: 08/01/2009 through 08/31/2009.
You may change the order of the list by clicking on the column heading by which you want the list sorted. This screen will also give you a count of memberships on the list, and a total amount of the dues payments that would be paid by these memberships. If you do not want to see memberships with Stop Mail, uncheck the box for Include Members Marked Stop Mail.
To print this list, click the Print List button at the bottom of the screen. The list will be printed as it appears on the screen, and also include Membership numbers, Types and Subtypes.
To print letters for the members on this list, click the Print or View Letters button. This will open MS-Word. You will be able to choose the letter you want to print, then do a mail merge printing for these members. This is an easy way to print renewal reminder letters or renewal thank you letters for your members. Letters are set up by going the Main Menu | Setup | Contacts | Mail Merge Letters. For more information about printing letters, please see Chapter 21 - Letters, Labels & Email.
To print labels or envelopes for the members on this list, click the Print or View Labels & Envelopes button at the bottom of the screen. You may set the Sort by order and choose your label style. These labels and envelopes can be printed to be used with the letters printed from this screen and for other mailings.
You may also process membership renewals from this screen by posting dues payments for the members on the list. Select a membership name and click Renewal. Enter the dues payment information and click Post. From this screen, you may also preview and print the member's dues history by clicking History, or preview or print the Dues Payment Receipt.
From the Membership Renewal List screen, you may also jump to a member's record by double clicking on the membership name. This can be helpful if you need to edit something on the member's record before printing or posting dues.
Change Membership# - If you need to change the Membership#, click this button. On the screen that appears, enter the new number and click OK. If the new number is already assigned to another membership, you will be asked to use a different number. This will not change the Contact ID#. The Membership# will be changed for all contacts in this membership.
Delete Membership - It is rare that an organization will want to delete membership records. However, you may delete a membership without deleting the contact record. If you want to completely remove the membership and all dues payments associated with it, you must first delete all dues payments paid to this the membership. The dues payments will not be deleted when you delete the membership. If there are dues payments when you click this button, you will receive a warning message telling you to delete the dues payments first, or the dues payments will no longer be associated with any membership. Once the dues payments are deleted, you may delete the membership.
If you have joined a contact to an existing membership, and you want to remove that contact from the existing membership and leave the existing (Bill to) membership intact, you may use this Delete Membership function. You do not need to delete any dues payments. Clicking this button will remove the link from the contact to the main membership, but it will not delete the membership itself. The membership can still be viewed on the main member's screen. The contact you are removing from the membership cannot be set as the Bill to Member. If he or she is the Bill to Member, you will need to designate another contact in the membership as the Bill to Member first, then delete the membership on the non-Bill to Member's record.