User Defined Folders and Lists
Unlike the Fixed Lists, User Defined Lists are created in and managed by folders. You may add folders for each user, or for projects, or any other arrangement you need. Lists are created within folders. You may view all lists, or just lists in one folder. The User Defined Lists are built by you to serve the needs of your organization. These lists may be viewed by only the list manager, if you have chosen to make lists private and security is activated.
Creating Folders and Lists
The first step in creating and managing User Defined Lists is creating folders. Please click Create a New Folder from the Sidebar and enter a new folder name. Click OK. Add as many folders as needed.
Once folders are in place, you are ready to create User Defined Lists. Click Create a New List from the Sidebar. Choose a Folder and List Manager from the drop-down menus on the Lists screen. If Security is not activated, the List Manager drop-down menu is built from the Users authority file. If Security is activated, the List Manager drop-down menu contains the names of the Users set up in security. If you do not want to assign a manager, you may choose the option "<Anyone>" from the list.
NOTE: The Users authority file is managed from Main Menu | Setup | Authority Files | Common Screens | Users. You can add, edit and delete Users from this setup screen.
Create a New Contacts List screen
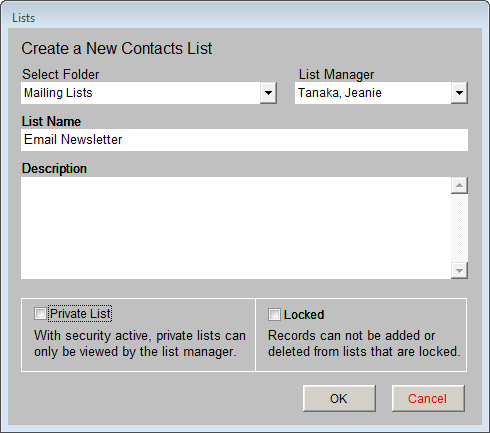
Enter a List Name and Description, and check if you wish to make this list private or locked. A Private List may be viewed only by the selected List Manager; please note that Security must be activated to turn on this restriction. For more information about setting up and activating Security, please review Chapter 3 - Getting Started. When you check Locked, contacts may not be added to or deleted from this list. For a new list, you will need to leave it unlocked until you add the desired contacts to the list. Click OK. Your new list will appear in the All Lists folder and in the specified folder under User Defined Lists.
Managing Lists
On the Contact List Manager screen, the Sidebar's Manage section has tools to manage the User Defined Folders and Lists. They enable you to add contacts to a list, delete a list, delete an empty folder, combine lists, subtract contacts on one list from another list, change list information, update summer/winter addresses, and view the mailing log.
Adding Contact Records to a List
After you create a new list, the next step is to add contact records to that list. A quick way to do this is to use a query, which you may do by clicking on Add Records to Selected List. At the Query screen, you can build a filter statement to select records for the list.
To build a filter statement to select records, use the drop-down menus for Field and Condition and enter text in Value. Then click the Add to Statement button. You may add more than one statement to your query. Once a filter statement has been created, run the query to select the records. Review the records in Query Results. You may remove records from the results list by clicking in the column on the left, then clicking Removed Marked Records. Then click Add Selected Contact Records to List.
TIP: You may choose the fields that are available in the Field drop-down menu by going to the Main Menu | Setup | Query Fields section.
Below are two examples of User Defined Lists which may be helpful in understanding building filter statements and, later, the view and action options.
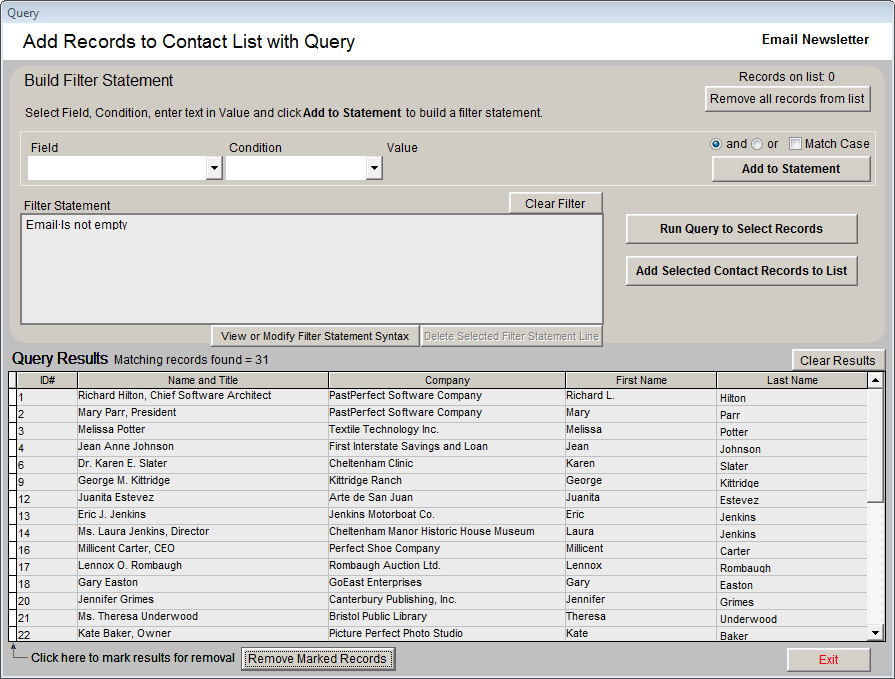
Example A: You need to create a list of contacts with email addresses to email them your newsletter. Select the field "Email" from the Field drop-down menu. Then from the Condition drop-down menu, select "Is not empty." Notice that there is no longer an option to enter a Value. Click the Add to Statement button, then Run Query to Select Records. Your filter will be saved when you exit. Your query results will appear in the grid at the bottom of the screen. Review the results and remove any contacts you do not want included on the list. Mark records for removal by clicking in the narrow, empty column at the left of the grid. The cell for that record will turn black. Then click the Remove Marked Records button. It will delete all marked records at once. When you have the records you want on the list, click Add Selected Contact Records to List. Click Exit.
Run Query to Select Records Example A
Now that you have a list, you can easily send an email to all the contacts on the list at one time. Please see the Printing and Exporting Lists section of this chapter for further instructions.
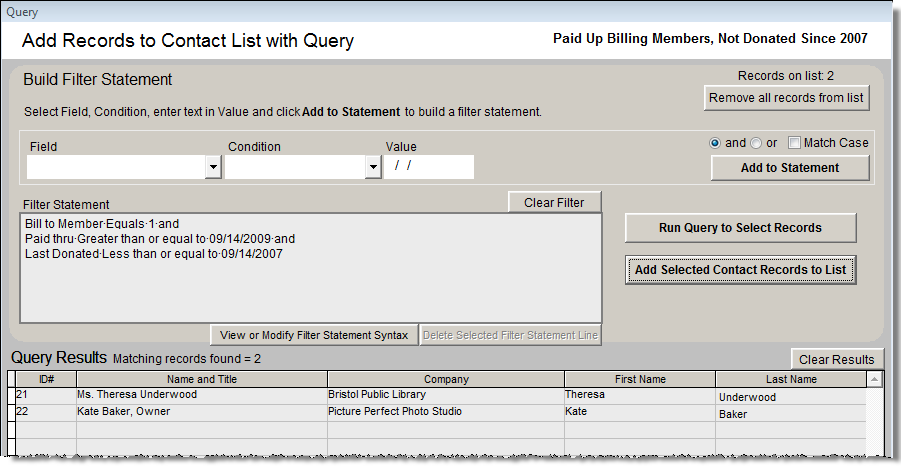
Example B: You would like to create a list of paid-up billing members who have not made monetary donations in the past two years, so you can find out who you should solicit for donations. To do this, you can build a compound filter statement and run a query. First select the field "Bill to Member" from the Field drop-down menu. To do this quickly, click the down arrow, then press the "B" key on your keyboard to see "Bill to Member" and other fields beginning with "B." Select the Bill to Member field. Next, use the Condition drop-down menu and choose "Equals." Please enter the number "1" in the Value box. Click Add to Statement.
Select the "and" radio button to create a statement where all conditions must be met. From the Field drop-down menu, select the field "Paid thru." You can do this by clicking on the down arrow and pressing the "P" key on your keyboard, or scroll through the field list until you find the field and click on it to select it. From the Condition drop-down menu, select "Greater than or equal to," then in the Value field, type in today's date in MM/DD/YYYY format, such as 09/14/2009. Click Add to Statement. From the Field drop-down menu, select the field "Last Donated." From the Condition menu, select "Less than or equal to," and enter the date that would be 2 years prior in the Value field, such as 09/14/2007. Click Add to Statement. Review the filter statement and then click the Run Query to Select Records button. The results will appear in the grid on the bottom half of the screen. Click Add Selected Contact Records to List to create the list. The filter statement will be saved when you exit this screen.
Run Query to Select Records Example B
You can now view records on this list, decide if there are any contacts you want to remove from the list, and print mail merge letters and labels for these contacts.
Are members who have not donated in the last couple of years located near your institution? You can see where these contacts are located geographically using the "Map Contact List" function. Please see the Map Contact List section later in this chapter for instructions.
Adding Contacts to a List from Contact Records
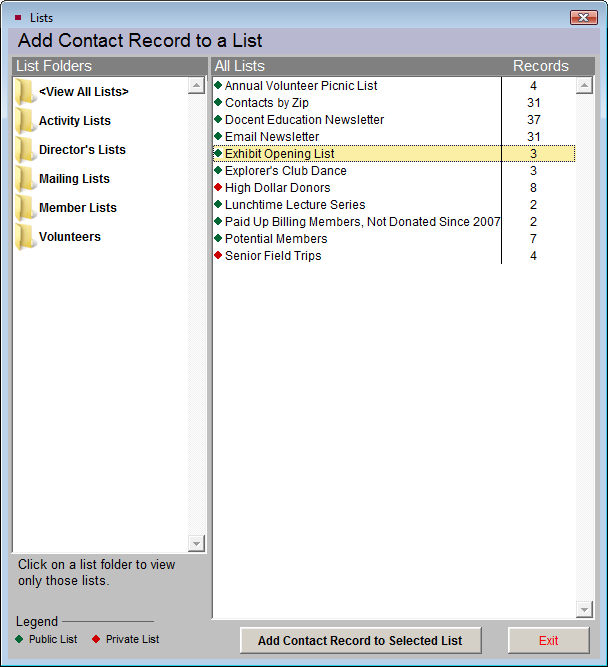
You may also put contacts on a list from contact records. On a contact record, click the Mailing Address button in the Sidebar under Screen View. On the bottom left side of the screen, you will see all the Contact Lists on which this contact has been placed. To add this contact to a list, click the plus sign button to the left of the lists, or click the button on the Sidebar for Add this Contact to a List. On the next screen, seen below, click on the list to which you want to add the record, then click the Add Contact Record to Selected List button at the bottom of the screen.
Add Contact Record to a List screen
Updating Existing User Defined Lists
Since the filter statement is saved for each User Defined List, you can quickly refresh your lists. For example, if you have a Recent Donors list, comprised of contacts who made their last donation during the month of March, and you now want to get a list of contacts who made their last donation during the month of April, you can update your list instead of creating a new list.
To update the list, on the Contacts List Manager screen, highlight the list and click Add Records to Selected List. Since the people who donated last in March are still on the list, click the Remove all records from list button at the top of the screen. This will clear the list so you can add just the people you want. The filter statement last used will appear in the Filter Statement area.
Modify Filter Statement
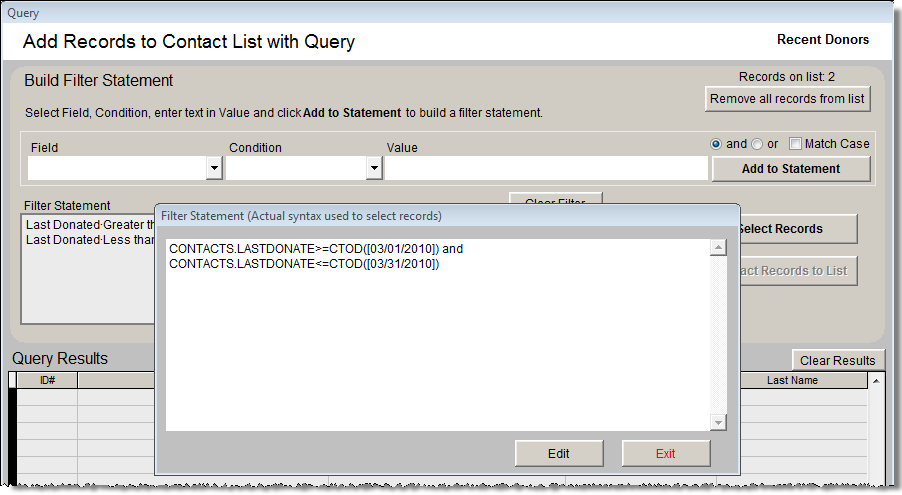
To update your filter, click View or Modify Filter Statement Syntax. The Filter Statement screen will appear. Click Edit to modify the text. Change the date in the first line to "04/01/2010" and change the date in the second line to "04/30/2010" to include just contacts who made their last donations in April. Then click Save and then click Exit to save the change to the filter. Click Run Query to Select Records, then Add Selected Contact Records to List to put contacts who last donated in April on the list. Once you exit from the Query screen, you can send letters or print a list of these selected contacts.
Deleting, Merging and Subtracting Lists
The following are additional tools for managing User Defined Lists.
Delete Selected List - Select the list to be deleted from the View All Lists folder or other folders. This option permanently removes the list from both Contacts List Manager screen and the Contact Lists view in each contact record.
Delete Selected List Folder - This option allows you to delete a folder that does not contain lists. If the folder has lists, please change each list's List Folder using the Change List Name or Parameters option. Or if the list is no longer needed, it may be deleted using Delete Selected List. Once the folder is empty, it too may be deleted.
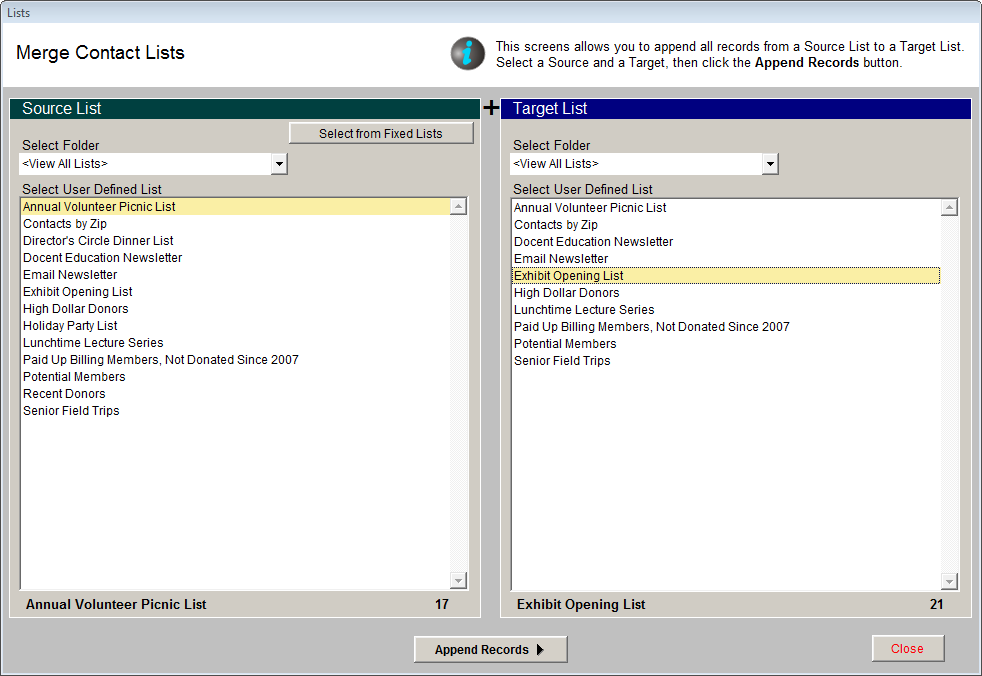
Merge Lists - You can combine lists by adding all records from a Source List to a Target List. On the Merge Lists screen, please choose the Source List from the list on the left. This is the list you will add to another list. If you would like to combine a Fixed List with another list, click the Select from Fixed Lists button at the top of the Source List section. Then choose the Target List from the list on the right. This is the list to which you will add the records. You will see the number of records on both the Source List and the Target List. When you have verified these are the correct lists, click the Append Records button. You will be prompted with the number of new records that will be added to the Target list, and how many records already exist on both the Source List and Target List that will not be added. If you wish to combine multiple lists, select another Source List from the left, keep the same Target List on the right, and click Append Records again. Warning: It is best to create a new list as the Target List and append Source Lists to it, rather than using an existing list. Creating a new list allows you to have the original lists available later.
Merge Contact Lists
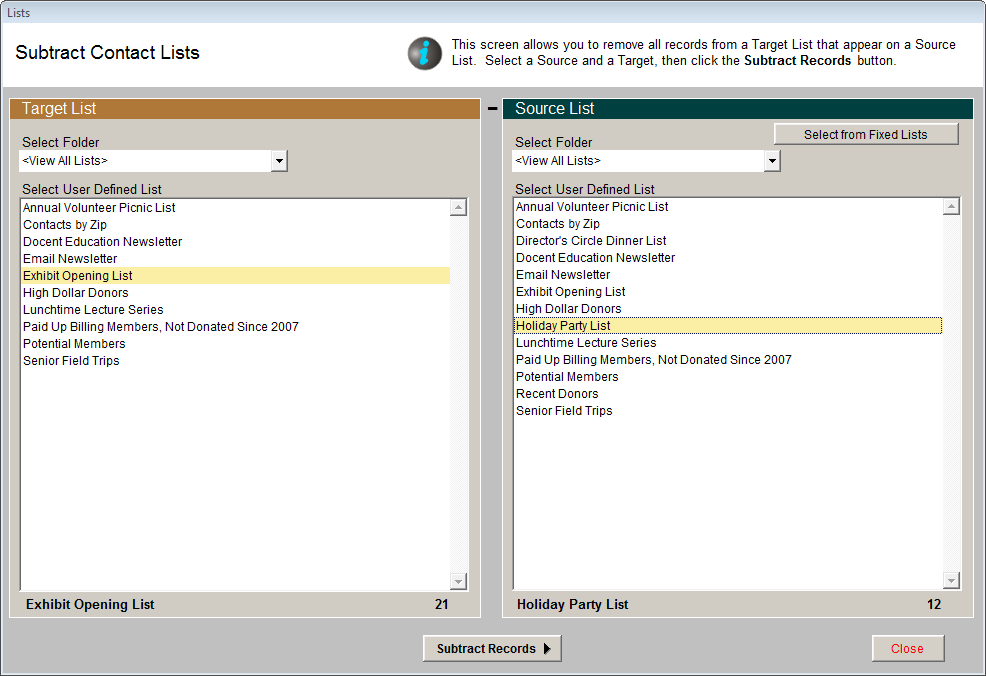
Subtract Lists - You may remove all contacts from a Target List that appear on a Source List. On the Subtract Lists screen, seen below, from the Target List on the left, select the list from which you want to subtract records. Select the Source List on the right with the records to subtract. You may select a Fixed List by clicking the Select from Fixed Lists button at the top of the Source List section. You will be removing records from the Target List. You will see the number of records on both the Source List and the Target List. When you have verified these are the correct lists, click the Subtract Records button. You will be prompted with the number of records that will be removed from the Target List, and how many records did not exist on the Source List to be removed from the Target List.
Subtract Contact Lists
Change List Name or Parameters - This screen allows you to change the List Folder, List Manager, List Name, Description, and private and locked settings. To view this screen, first click on the list name, then click the Change List Name or Parameters button.
Change Folder Name - To change the name of an existing folder, click on the folder name, then click the Change Folder Name button. Enter the new name, then click OK.